Time to blog isn't something I normally seem to come up with. However, I've recently been planning to write some additional tech articles related to Python and do some experiments with TensorFlow. If I'm successful that will show up Soon(tm).
One thing that's got me excited recently is the IoT use of Python and TensorFlow to build small, DIY smart devices. Another is hydroponics and environmental conditioning.
I'm working with all of that plus real life but I always benefit from others sharing what they do. So, here's a note to remind myself to do that.
Wednesday, May 1, 2019
Friday, March 2, 2018
Python and Networking -- Part I
Part I: Introduction
I'm going to attempt to lay out a set of useful Python scripts that allow for easier management of mid-to-large networks. I'll be using Netmiko (the relative of Paramiko) which is an SSH session tool. In this case Netmiko actually does let you create and manage a SSH session -- something Paramiko doesn't really do in any practical sense.
Warning: If you're into just seeing how someone hacks together solutions for collecting data and automating commands you're in luck. Also, I'm not promising what I do here is always an optimal solution! I'm throwing this out for learning purposes -- even if I try to make the code as complete as possible in a reasonable amount of time. So disclaimer: This isn't a package solution for production! You can make it into one, though, and hopefully these tutorials will help.
There are lots of reasons to automate network tasks and the most important one is nobody can reasonably configure dozens or hundreds of switches without automation. Even so there are times when such horrible things must happen -- but let's keep them to a minimum, OK?
The other next most important reason is that analyzing information about your network requires you to not just look at one switch, router or firewall but to analyze the data across many (or all) of them. Automation allows you to gather data across all devices and create reports or even help you trigger actions.
Focus: The articles that I'm about to start producing will be focused entirely on Juniper switches. However, the fundamentals are easily ported to other device brands like Cisco. The analysis functions I will show, however, are structured around how Juniper reports information and how it's configuration process works.
Part I: The Essentials
The first thing we need is a quick framework to connect to switches and send/receive data. The following class we'll be using will be saved into it's own file named NetworkAutomation.py:
The above class gives us everything we need to get started for the framework. I've put some hooks in to let us print debug output. Well, it has almost everything... Here's a launcher subroutine that completes the template we will use to call this class. As we move forward this template will expand. This bit of code is in a file named automationtest.py:
We can see several things about the above use template that let us know how easy it is to use the class. First is we send just a username and password (which is encoded) to the class constructor (bot=NetworkAutomation(connect_p)). Later we can send a few additional flags for debugging and specific settings -- but really, this is the only constructor I really ever use in production.
The second is we create a dictionary of commands to send -- these are in the form of "command label" : "actual command". This lets us send a large number of commands relevant to whatever it is we want to do. The label bit allows us to parse our results so we know how to analyze the data and subsequently take action.
The third bit is the parameter wrapper that allows us to send the rest of the parameters to the class. It wraps the commands we want plus whether to show debug output, the switch (or other network device) we are connecting to and the type of switch that we're connecting to.
In the next post we'll take a look at parsing the actual results. I have a huge amount of actual production and development code to sanitize to make this all easy to understand.
I'm going to attempt to lay out a set of useful Python scripts that allow for easier management of mid-to-large networks. I'll be using Netmiko (the relative of Paramiko) which is an SSH session tool. In this case Netmiko actually does let you create and manage a SSH session -- something Paramiko doesn't really do in any practical sense.
Warning: If you're into just seeing how someone hacks together solutions for collecting data and automating commands you're in luck. Also, I'm not promising what I do here is always an optimal solution! I'm throwing this out for learning purposes -- even if I try to make the code as complete as possible in a reasonable amount of time. So disclaimer: This isn't a package solution for production! You can make it into one, though, and hopefully these tutorials will help.
There are lots of reasons to automate network tasks and the most important one is nobody can reasonably configure dozens or hundreds of switches without automation. Even so there are times when such horrible things must happen -- but let's keep them to a minimum, OK?
The other next most important reason is that analyzing information about your network requires you to not just look at one switch, router or firewall but to analyze the data across many (or all) of them. Automation allows you to gather data across all devices and create reports or even help you trigger actions.
Focus: The articles that I'm about to start producing will be focused entirely on Juniper switches. However, the fundamentals are easily ported to other device brands like Cisco. The analysis functions I will show, however, are structured around how Juniper reports information and how it's configuration process works.
Part I: The Essentials
The first thing we need is a quick framework to connect to switches and send/receive data. The following class we'll be using will be saved into it's own file named NetworkAutomation.py:
'''NetworkAutomation.py
'''
from netmiko import ConnectHandler
import base64
import pprint

class NetworkAutomation:
 # Constructor
 def __init__(self,p):
  self.username = p["username"]
  self.pwd_mask = p["pwd_mask"]

 #Utility
 def copyArray(self,array):
  new_array = []
  for item in array:
   new_array.append(item.strip())
  return new_array

 def QueryHandler(self,p):
  pp = pprint.PrettyPrinter(indent=4)
  commands_type = p["cmd_type"]
  show_output = p["show_output"]
  switch = p["switch"]
  switch_manifest = {
   'device_type': p["switch_type"],
   'ip':   switch,
   'username': self.username,
   'password': str(str(base64.b64decode(self.pwd_mask))[2:-1]),
   'verbose': False
  }
  command_type_output = {}
  with ConnectHandler(**switch_manifest) as net_connect:
   for cmd_type in commands_type.keys():
    command = commands_type[cmd_type]
    if (show_output):
     print("%s\t%s" % (cmd_type.upper(),command))
    results = net_connect.send_command(command)
    results_split = self.copyArray( results.split('\n') )
    command_type_output[cmd_type] = results_split
    if (show_output):
     pp.pprint(results_split)
  return command_type_output
The above class gives us everything we need to get started for the framework. I've put some hooks in to let us print debug output. Well, it has almost everything... Here's a launcher subroutine that completes the template we will use to call this class. As we move forward this template will expand. This bit of code is in a file named automationtest.py:
from NetworkAutomation import NetworkAutomation
def StartProcess():
 connect_p = {"username":"useraccess","pwd_mask":"Hgj3Keff9="}
 bot = NetworkAutomation(connect_p)

 command_types = {
  'result_config' : "show configuration|display set",
  'result_lldp_neighbors'  : "show lldp neighbors",
  'result_vlans'  : "show vlans"
 }
 command_p = {
  "cmd_type"  : command_types,
  "show_output" : False,
  "switch"  : "10.1.40.2",
  "switch_type"  : "juniper"
 }
 results = bot.QueryHandler(command_p)
We can see several things about the above use template that let us know how easy it is to use the class. First is we send just a username and password (which is encoded) to the class constructor (bot=NetworkAutomation(connect_p)). Later we can send a few additional flags for debugging and specific settings -- but really, this is the only constructor I really ever use in production.
The second is we create a dictionary of commands to send -- these are in the form of "command label" : "actual command". This lets us send a large number of commands relevant to whatever it is we want to do. The label bit allows us to parse our results so we know how to analyze the data and subsequently take action.
The third bit is the parameter wrapper that allows us to send the rest of the parameters to the class. It wraps the commands we want plus whether to show debug output, the switch (or other network device) we are connecting to and the type of switch that we're connecting to.
In the next post we'll take a look at parsing the actual results. I have a huge amount of actual production and development code to sanitize to make this all easy to understand.
Thursday, April 21, 2016
Using pymysql with Python 3.5
So instead of moving forward with anything I mentioned before... Ta Da!
This bit of Python code makes it very easy to connect to a MySQL database using pymysql.
Anyone who has decided to move to Python 3.5 and also developing scripts for MySQL will have discovered that many libraries aren't yet compatible. MySQL connector is at the time of this writing (4-21-2016) only compatible with Python 3.4.
I imagine most libraries will have moved to 3.5 soon enough but there are plenty of reasons to use pymysql as a base library -- for one it is very Pythonic.
Problems that seemed common when I did a quick search on this topic:
Authentication Errors
While there are plenty of reasons for this the most common are:
Anyway, in case you were looking for this here it is:
As you can see this is a very simple class--but this is the basic skeleton I'd start with and expand on.
The pymysql (which is imported as "mdb") stuff happens within the MySQLUtility class. There are a few interesting things that happen in the script as a whole:
This bit of Python code makes it very easy to connect to a MySQL database using pymysql.
Anyone who has decided to move to Python 3.5 and also developing scripts for MySQL will have discovered that many libraries aren't yet compatible. MySQL connector is at the time of this writing (4-21-2016) only compatible with Python 3.4.
I imagine most libraries will have moved to 3.5 soon enough but there are plenty of reasons to use pymysql as a base library -- for one it is very Pythonic.
Problems that seemed common when I did a quick search on this topic:
Authentication Errors
While there are plenty of reasons for this the most common are:
- The user in MySQL aren't set up correctly -- either because 'user'@'localhost' or 'user'@'%' aren't set up or the user doesn't have the expected access in the GRANT tables
- There's some script-related problem -- I cover one possibility below
- All the other obvious reasons why anything can't connect to anything
Anyway, in case you were looking for this here it is:
import pymysql as mdb
import sys
import base64

class MySQLUtility:
 def __init__(self,**db_params):
  self.connection_parameters = db_params

 def QueryAndReturnRows(self,query):
  with mdb.connect( **self.connection_parameters ) as db:
   db.execute(query)
   rows = db.fetchall()
   return rows

def testUtility():
 password = base64.b64decode(b'HsKeTbb0=').decode('utf-8')
 connect_params = {
   'user': "planetman",
   'password': password,
   'host': '10.1.15.25',
   'port' : 4308,
   'db': 'planetdb',
   'charset': 'utf8mb4',
   'cursorclass' : mdb.cursors.DictCursor
 }
 msqltool = MySQLUtility(**connect_params)
 port_rows = msqltool.QueryAndReturnRows("SELECT PortName,Location,IPAddress,MACAddress FROM ports")
 for row in port_rows:
  print(row)
As you can see this is a very simple class--but this is the basic skeleton I'd start with and expand on.
The pymysql (which is imported as "mdb") stuff happens within the MySQLUtility class. There are a few interesting things that happen in the script as a whole:
- Many people encode a password just so it isn't easy to automatically read as plain-text. Config files often contain passwords and while encryption would be best encoding is better than plain-text. In this case I'm assuming you've encoded a password with the base64 method. In Python 3 you need to really treat the encoding as bytes -- and when decoding tell base64.b64decode() what flavor of string you expect. In this case we want a 'utf-8' string decoded from the b64 byte string. Otherwise base64.b64decode(b'some encoded text') will return literal b'some encoded text'. And then MySQL will reject with a failed password error.
- Use the **params method of passing data structures. It's just easy and looks good.
- Connection methods in all libraries look almost exactly the same. The underlying code connecting to MySQL supports and expects the things that MySQL supports and expects (like cursors).
OK that's it for today. I've got several larger examples of things for later when I can get time to make put them into a readable form.
Friday, April 8, 2016
More on API Feeds -- HTTPLIB[X] versus URLLIB[X]
Just a quick note:
Someone asked me why I wouldn't feature httplib2 again for API feeds. The reason is I was going for the simplest possible utility possible. One thing is httplib requires more manual labor to prep a connection. I think it's important to understand how that works but when you're just trying to get things done who wants to rinse and repeat when you can basically "one line it"?
We aren't doing special, custom things nor are we handling things like cookies so I chose plain ol' urllib. Chuzzah!
#urllib #httplib #python #api
Wednesday, April 6, 2016
More on API Feeds
I'm not consistent about self-publishing. But sometimes stuff strikes me and I'm pretty sure there's something cool to share. For awhile now I've thought that sharing Python snippets would be an easy thing to throw onto a blog and regularly.
To kick that off here's an bit on API feeds -- namely retrieving them. Anymore I use Python and for about a year now Python 3.X. Most API pulls are usually part of a data analysis or presentation project and as such nobody wants to waste more time pre-coding rigid and overly complicated data structures and for certain not going through a lot of effort just to receive that data. Working over the data is what you want to get on with.
So, for awhile now I've used something like the following Python class for retrieving XML or JSON. The nice thing is that urllib and xmltodict have made it fairly transparent to process either XML or JSON for about 99% of anything I need to access (barring minor tweaks).
And there we go.
When requesting most data you pass some info in the HTTP "header" / URL. The above class assumes a couple of things:
1) you know how the URL should be formed
2) The URL is encoded with '&' as the delimiter
In every case in my recent history the class above works -- but always check the API documentation for the website you're pulling data from. I've written a lot of different socket and request classes in various languages over the years -- keep in mind this is the simplest utility class I could come up with. No matter the specific delimiters and options a URL will be formed as [base url][options]. A URL can be any kind of file-stream protocol request, technically. For example it could be a file on your computer, an HTTP GET from a web server or an FTP request.
Using the above class here are two examples:
Example 1
In this bit of code you can see that we're requesting some JSON from a website. Their API requires a base URL and some options. To save space I cheat a bit and add the "request" onto the end of the base url (e.g., "weather?"). I then create a dict that holds the "&" delimited options: the API key for the data account and some other stuff.
This example pulls some air quality data from Open Weather Map website.
Run the above code and you'll get some JSON output like:
Now, honestly, this is where I confess that I dislike XML. Not in some absolute way, just that it's so overblown and overly complicated for most basic needs. XML is overhead. JSON is a Python dictionary, enough said. Nevertheless I've used XML a lot. I've usually worked hard to strip down my XML needs to very well defined and pared down functionality. Managing XML and XSLT is like asking for trouble.
But, here we go. Almost the same exact method -- and in the Python class I actually use xmltodict to transform XML data into JSON/dict format. I'm using Python for it's usability so why wouldn't I? Well, you'll see in this example that the data doesn't come back quite the same. But this is because the website's API treats that data differently. Since we can get JSON I don't care.
Example 2
And the output is:
Now, for those API cases where you have formats that go beyond [base url][?|format={format}][options|&more_options] it's easy enough to format the URL per your specific API needs. You can request anything with a URL like images, video, whatnots. As long as you can pass that data to something that handles that MIME format you're in web business.
As usual, anyone desperately trying to make something work should do their best to understand what it is they're doing. Results can and will vary!
I've got a bunch of Python to share as I can fit it in. Next up I think it'll either be handling Juniper switches with Paramiko and Python or Windows Netlogon parsing.
Cheers.
#python #api #xml #json
To kick that off here's an bit on API feeds -- namely retrieving them. Anymore I use Python and for about a year now Python 3.X. Most API pulls are usually part of a data analysis or presentation project and as such nobody wants to waste more time pre-coding rigid and overly complicated data structures and for certain not going through a lot of effort just to receive that data. Working over the data is what you want to get on with.
So, for awhile now I've used something like the following Python class for retrieving XML or JSON. The nice thing is that urllib and xmltodict have made it fairly transparent to process either XML or JSON for about 99% of anything I need to access (barring minor tweaks).
import urllib.request
import urllib.response
from urllib.error import HTTPError
import json
import xmltodict
from os.path import join

class APIRetrieve:
 def __init__(self,startswith_url,options_dict,debug=False):
  #self.options = "&".join(myList)
  self.options = []
  self.data = {}
  options_list = []
  for key in options_dict:
   options_list.append("%s=%s" % (key,options_dict[key]))
  options = "&".join(options_list)
  self.full_url = ("%s&%s" % (startswith_url,options))
  if (debug == True):
   print ("%s" % self.full_url)

 def APIRequestJSON(self):
  req = urllib.request.Request(self,full_url)
  try:
   response = urllib.request.urlopen(req).read().decode("utf-8")
   self.data=json.loads(response)
  except HTTPError as e:
   print(e.read().decode("utf-8"))

  return self.data

 def APIRequestXML(self):
  req = urllib.request.Request(self.full_url)
  try:
   response = urllib.request.urlopen(req).read().decode("utf-8")
   self.data=xmltodict.parse(response, process_namespaces=True)
  except HTTPError as e:
   print(e.read().decode("utf-8"))

  return self.data
And there we go.
When requesting most data you pass some info in the HTTP "header" / URL. The above class assumes a couple of things:
1) you know how the URL should be formed
2) The URL is encoded with '&' as the delimiter
In every case in my recent history the class above works -- but always check the API documentation for the website you're pulling data from. I've written a lot of different socket and request classes in various languages over the years -- keep in mind this is the simplest utility class I could come up with. No matter the specific delimiters and options a URL will be formed as [base url][options]. A URL can be any kind of file-stream protocol request, technically. For example it could be a file on your computer, an HTTP GET from a web server or an FTP request.
Using the above class here are two examples:
Example 1
In this bit of code you can see that we're requesting some JSON from a website. Their API requires a base URL and some options. To save space I cheat a bit and add the "request" onto the end of the base url (e.g., "weather?"). I then create a dict that holds the "&" delimited options: the API key for the data account and some other stuff.
This example pulls some air quality data from Open Weather Map website.
def test_json_weather():
 base_url = "http://api.openweathermap.org/data/2.5/weather?"
 options = {
  'zip' : '98230',
  'APPID' : 'df58cfc63456b48a97f21a63f561b572'
 }
 api_weather = APIRetrieve(base_url,options)
 current_weather = api_weather.APIRequestJSON()
 print(current_weather)
Run the above code and you'll get some JSON output like:
{'dt': 1459982245, 'wind': {'speed': 5.7, 'deg': 250}, 'clouds': {'all': 75}, 'cod': 200, 'main': {'humidity': 71, 'temp_max': 292.93, 'temp': 289.04, 'temp_min': 286.15, 'pressure': 1027}, 'weather': [{'id': 803, 'icon': '04d', 'main': 'Clouds', 'description': 'broken clouds'}], 'id': 5787475, 'sys': {'sunset': 1459997516, 'type': 1, 'country': 'US', 'sunrise': 1459949691, 'id': 3245, 'message': 0.0083}, 'name': 'Blaine', 'coord': {'lon': -122.75, 'lat': 48.99}, 'base': 'cmc stations'}
Now, honestly, this is where I confess that I dislike XML. Not in some absolute way, just that it's so overblown and overly complicated for most basic needs. XML is overhead. JSON is a Python dictionary, enough said. Nevertheless I've used XML a lot. I've usually worked hard to strip down my XML needs to very well defined and pared down functionality. Managing XML and XSLT is like asking for trouble.
But, here we go. Almost the same exact method -- and in the Python class I actually use xmltodict to transform XML data into JSON/dict format. I'm using Python for it's usability so why wouldn't I? Well, you'll see in this example that the data doesn't come back quite the same. But this is because the website's API treats that data differently. Since we can get JSON I don't care.
Example 2
def test_xml_weather():
 #&mode=xml
 base_url = "http://api.openweathermap.org/data/2.5/weather?"
 options = {
  'zip' : '98230',
  'APPID' : 'df58cfc63456b48a97f21a63f561b572',
  'mode' : 'xml'
 }
 api_weather = APIRetrieve(base_url,options)
 current_weather = api_weather.APIRequestXML()
 print(current_weather)
And the output is:
OrderedDict([('current', OrderedDict([('city', OrderedDict([('@id', '5787475'), ('@name', 'Blaine'), ('coord', OrderedDict([('@lon', '-122.75'), ('@lat', '48.99')])), ('country', 'US'), ('sun', OrderedDict([('@rise', '2016-04-06T13:34:51'), ('@set', '2016-04-07T02:51:56')]))])), ('temperature', OrderedDict([('@value', '289.04'), ('@min', '286.15'), ('@max', '292.93'), ('@unit', 'kelvin')])), ('humidity', OrderedDict([('@value', '71'), ('@unit', '%')])), ('pressure', OrderedDict([('@value', '1027'), ('@unit', 'hPa')])), ('wind', OrderedDict([('speed', OrderedDict([('@value', '5.7'), ('@name', 'Moderate breeze')])), ('gusts', None), ('direction', OrderedDict([('@value', '250'), ('@code', 'WSW'), ('@name', 'West-southwest')]))])), ('clouds', OrderedDict([('@value', '75'), ('@name', 'broken clouds')])), ('visibility', None), ('precipitation', OrderedDict([('@mode', 'no')])), ('weather', OrderedDict([('@number', '803'), ('@value', 'broken clouds'), ('@icon', '04d')])), ('lastupdate', OrderedDict([('@value', '2016-04-06T22:37:25')]))]))])
Now, for those API cases where you have formats that go beyond [base url][?|format={format}][options|&more_options] it's easy enough to format the URL per your specific API needs. You can request anything with a URL like images, video, whatnots. As long as you can pass that data to something that handles that MIME format you're in web business.
As usual, anyone desperately trying to make something work should do their best to understand what it is they're doing. Results can and will vary!
I've got a bunch of Python to share as I can fit it in. Next up I think it'll either be handling Juniper switches with Paramiko and Python or Windows Netlogon parsing.
Cheers.
#python #api #xml #json
Saturday, January 18, 2014
Code for Xively Egg Feed
So, I'm going to jump ahead a little bit. Because I'm lazy / short on time and so forth.
Create an Xively account and add a device following their instructions (https://xively.com). I can cover this later but I think it's pretty well covered all over the place.
Next, add some code to your Egg Base Station code.
Add the following code to your Arduino project. I put this function into the sensors.ino file of the AQEBase.ino project.
At the bottom just paste the following -- be sure to add your own Feed and API key:
Next here's some python you can use to pull your data. In my case I created a feed using the basic labels from the Egg so they come through as "CO", "CO_raw", "CO_r0", etc. I also have a dust sensor. Once you have the feed set up you'll have your Feed ID and API keys (see above). I recommend creating another API key that is read-only -- use this in your python script and you can share the code with others without fear of anything other than someone reading your data.
I provide this code here in the hopes it's helpful. There's not a lot of great documentation on interacting with Xively in a simple way. Frankly the Xively API library is just an ugly way to go about reading the data (see my pastebin: http://pastebin.com/y8RDP3Wi). I'll cover more on this code later -- and we'll expand on it. I wanted to get some more technical stuff out here, though, for those tired of the really simple introduction and overview.
Create an Xively account and add a device following their instructions (https://xively.com). I can cover this later but I think it's pretty well covered all over the place.
Next, add some code to your Egg Base Station code.
Add the following code to your Arduino project. I put this function into the sensors.ino file of the AQEBase.ino project.
At the bottom just paste the following -- be sure to add your own Feed and API key:
// Comment
char xively_website[] PROGMEM = "api.xively.com";
#define FEED    "11111111"   // Feed ID
#define APIKEY  "xxxxxxxxxxxxxxxxxxxxxxxxxxxxxxxxxxxxxxxxxxxxx" // Put Your APIKEY here

Stash xively_stash;

void sendXively(char *channel, int value){
   Serial.println(F("Sending data to Xively"));
   Serial.print(F("Data Type: "));
   Serial.write(channel);
   Serial.println(" ");
   Serial.print(F("Data Value: "));
   Serial.println(value);
   // by using a separate stash,
   // we can determine the size of the generated message ahead of time
   byte sd = xively_stash.create();

   xively_stash.print(channel);
   xively_stash.print(",");
   xively_stash.println(value);
   xively_stash.save();

   // generate the header with payload - note that the stash size is used,
   // and that a "stash descriptor" is passed in as argument using "$H"
   Stash::prepare(PSTR("PUT http://$F/v2/feeds/$F.csv HTTP/1.0" "\r\n"
                    "Host: $F" "\r\n"
                    "X-PachubeApiKey: $F" "\r\n"
                    "Content-Length: $D" "\r\n"
                    "\r\n"
                    "$H"),
            xively_website, PSTR(FEED), xively_website, PSTR(APIKEY), xively_stash.size(), sd);

   // send the packet - this also releases all stash buffers once done
   ether.tcpSend();
   Serial.println(F("Data sent"));
}
The code above is drawn from: Wicked Device: Nanode Gateway Remote Tutorial 3
Next here's some python you can use to pull your data. In my case I created a feed using the basic labels from the Egg so they come through as "CO", "CO_raw", "CO_r0", etc. I also have a dust sensor. Once you have the feed set up you'll have your Feed ID and API keys (see above). I recommend creating another API key that is read-only -- use this in your python script and you can share the code with others without fear of anything other than someone reading your data.
import json
import urllib
import httplib

xivelyhost = 'api.xively.com'
feedurl = '/v2/feeds/1703619548'
feedid = '170361954'
apikey = 'EsTjqWQlHyj69kBKBYbtoanldlKxAb7HalVxzW5ef2V5x296' # Read-Only Key

#
# Example 1: Pulling JSON Feed from my read-only APIKey URL
#
#params = urllib.urlencode({'datastream': 'CO,NO2,Dust,Temperature,Humidity'))
headers = {"Content-type": "application/x-www-form-urlencoded", "Accept": "application/json", "X-ApiKey": apikey}
http = httplib.HTTPConnection(xivelyhost)
http.request("GET", feedurl , '', headers)
response = http.getresponse()
print(response.status, response.reason)

eggdata = json.load(response)

http.close()


print("Example 1")
#print(eggdata)
#for datastream in eggdata['datastreams']:
#    print("{")
#    for key in datastream:
#        print key,datastream[key]
#    print("}")

datastream_keys = ('CO','Dust','NO2','Temperature','Humidity')
eggdict = {datastream['id'] : datastream['current_value'] for datastream in eggdata['datastreams'] if (datastream['id'] in datastream_keys)}

print(eggdict)
I provide this code here in the hopes it's helpful. There's not a lot of great documentation on interacting with Xively in a simple way. Frankly the Xively API library is just an ugly way to go about reading the data (see my pastebin: http://pastebin.com/y8RDP3Wi). I'll cover more on this code later -- and we'll expand on it. I wanted to get some more technical stuff out here, though, for those tired of the really simple introduction and overview.
Wednesday, January 15, 2014
Air Quality Egg -- Part 3
For this part we're going to open up the Arduino IDE, take a look at the settings, open up the Base Station code and update the Base Station Egg.
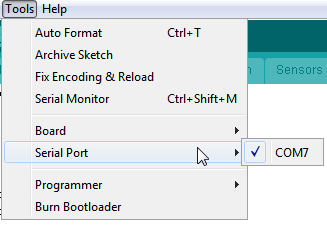
Open your Arduino IDE and choose the appropriate file:
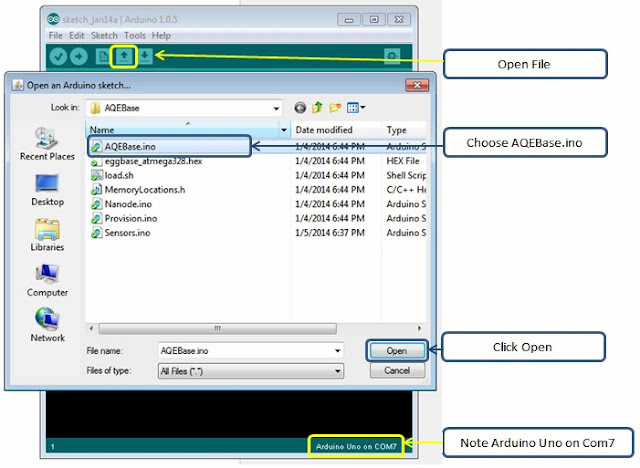
Using the IDE to update an Arduino is well documented. When you open the .ino file the IDE will open all the of the project files. You do need to set the Arduino as "Arduino Uno". The link in the previous post covers how to do all that but basically you'll need to choose the board you want:

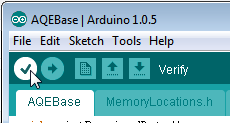
Now that we're to this point it's time to check some things. First, let's compile the Egg Base Station code (AQEBase.ino project). There's a checkmark that verifies the code.
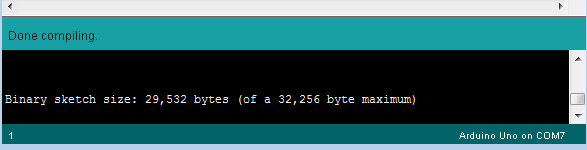
After you click this wait for a bit while the code is compiled. Then check the results. Unless something is terribly wrong you'll see:
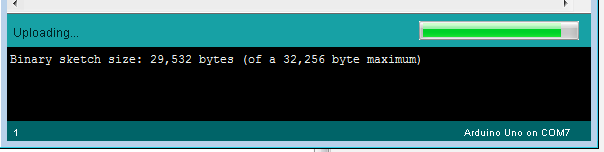
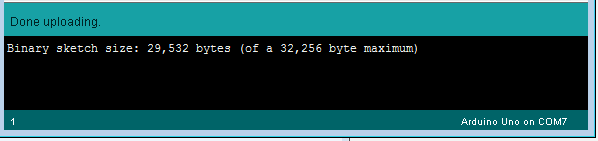
Now that that's done go ahead and upload the sketch (what Arduino calls it's projects) to your Egg Base Station. Just click the arrow.

You'll see the progress in the bottom of the window.
And if your device is actually connected on the correct COM port you'll see success!
My experience has been that if you check the serial ports listed under Tools > Serial Ports you'll see the correct port listed. If you have more than one FTDI or COM device you may need to unplug the others to find out which is your Egg.
To do the Remote Station Egg you'll have to take the sensor board off. With all pin-and-header boards be careful. Slowly and gently rock the board ever so slightly while pulling up.
Also I should of told you this before but you don't have to have your Egg plugged into AC power when you have the FTDI cable plugged in. The Egg will pull power from USB. I know at least one other person realized that the power adapter is removed when you take the shield off of the Remote Station Egg. That's OK.
To update the Remote Station do the same stuff we did above only using the AQERemote.ino project sketch.
Next I'm going to lay out a bit of a project plan for what I'm doing with my Eggs. We'll connect the Egg data to your own Xively account and start by writing some Python code to pull that data for your own use. After that the project gets a bit more ambitious but should be fun.
-------
Open your Arduino IDE and choose the appropriate file:

Using the IDE to update an Arduino is well documented. When you open the .ino file the IDE will open all the of the project files. You do need to set the Arduino as "Arduino Uno". The link in the previous post covers how to do all that but basically you'll need to choose the board you want:
Now that we're to this point it's time to check some things. First, let's compile the Egg Base Station code (AQEBase.ino project). There's a checkmark that verifies the code.
After you click this wait for a bit while the code is compiled. Then check the results. Unless something is terribly wrong you'll see:
Now that that's done go ahead and upload the sketch (what Arduino calls it's projects) to your Egg Base Station. Just click the arrow.
You'll see the progress in the bottom of the window.
And if your device is actually connected on the correct COM port you'll see success!
My experience has been that if you check the serial ports listed under Tools > Serial Ports you'll see the correct port listed. If you have more than one FTDI or COM device you may need to unplug the others to find out which is your Egg.
To do the Remote Station Egg you'll have to take the sensor board off. With all pin-and-header boards be careful. Slowly and gently rock the board ever so slightly while pulling up.
Also I should of told you this before but you don't have to have your Egg plugged into AC power when you have the FTDI cable plugged in. The Egg will pull power from USB. I know at least one other person realized that the power adapter is removed when you take the shield off of the Remote Station Egg. That's OK.
To update the Remote Station do the same stuff we did above only using the AQERemote.ino project sketch.
Next I'm going to lay out a bit of a project plan for what I'm doing with my Eggs. We'll connect the Egg data to your own Xively account and start by writing some Python code to pull that data for your own use. After that the project gets a bit more ambitious but should be fun.
-------
Subscribe to:
Posts (Atom)